Have you ever been tasked with setting up a robust data infrastructure on Azure and wondered where to begin? You might have heard about Medallion Architecture, which efficiently manages data lakes using three simple yet powerful layers: bronze, silver, and gold. But how do you transition from a blank Azure Data Lake Storage (ADLS) to a finely tuned data architecture ready for analytics?
This article describes using Terraform to construct the Medallion Architecture on Azure Data Lake Storage (ADLS). For those who do not know, Terraform is an infrastructure-as-code solution that automates the creation and management of cloud resources.
If you’re unfamiliar with the Medallion architecture, we’ll explain it in detail throughout this guide.
You’re about to embark on a journey that blends the power of Terraform’s infrastructure-as-code capabilities with the strategic brilliance of the Medallion approach. By the end of this post, you’ll be able to set up a scalable, organized, and efficient data architecture on Azure, all through Terraform scripts.
Understanding Medallion Architecture for Azure ADLS
In the world of data engineering, the Medallion Architecture stands out as a beacon of efficiency and organization. But what exactly is it, and how can it transform your data lake strategy on Azure Data Lake Storage (ADLS)?
What is medallion architecture?
The Medallion Architecture is a data management framework designed to optimize the way data flows through your lakehouse. It’s structured around three distinct layers, bronze, silver, and gold, serving a specific purpose in the lifecycle of your data.
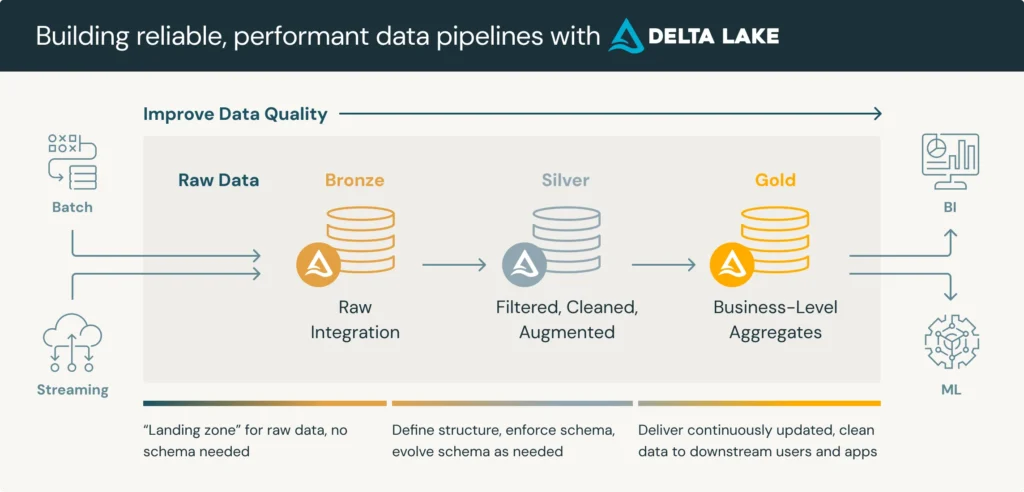
- Bronze Layer (Raw Data): This is the landing zone for your raw, unprocessed data. Think of it as the “source of truth,” where data is ingested in its original form, straight from various sources such as IoT devices, transactional databases, or data streams. The primary goal here is to store data as it arrives, preserving its raw fidelity for future processing.
- Silver Layer (Cleaned and Enriched Data): Once the data is in the Bronze layer, it undergoes transformation and cleaning before being promoted to the Silver layer. This is where you perform tasks such as removing duplicates, handling missing values, and applying basic transformations. The silver layer provides a cleaner, more refined version of the data, ready for more complex processing or analytical queries.
- Gold Layer (Aggregated and Curated Data): The gold layer is where the polished data resides. This layer is optimized for analytics and business intelligence. Here, data is aggregated, further enriched, and structured for direct consumption by dashboards, reports, and advanced analytics applications. It represents the final, highly curated state of your data, ready for actionable insights.
Why Use the Medallion Architecture on Azure ADLS?
Azure ADLS (Azure Data Lake Storage) provides a scalable and secure storage solution that is perfect for implementing the Medallion Architecture. Here’s why the medallion approach shines in this context:
- Scalability: As your data grows, Azure ADLS scales seamlessly. The Medallion layers allow you to handle increasing data volumes by compartmentalizing each data processing stage. This structured approach ensures that your lakehouse can grow without becoming unwieldy.
- Efficiency: The clear separation of concerns across the Bronze, Silver, and Gold layers ensures that each step of data processing is handled optimally. Raw data can be stored cheaply in the Bronze layer, while the more valuable processed data can be stored with higher efficiency in the Gold layer, reducing overall storage costs and processing time.
- Flexibility: Using Terraform to implement the Medallion Architecture on Azure ADLS gives you unparalleled flexibility. Terraform’s infrastructure-as-code paradigm means you can script, version, and automate the deployment of your data architecture, making it easier to replicate and modify as your needs evolve.
- Data Integrity: The tiered structure helps maintain data integrity and quality. By clearly defining the data at each stage, you minimize the risk of errors and inconsistencies. This ensures that by the time data reaches the gold layer, it’s in a state that can be trusted for critical business decisions.
- Reusability: With Terraform, you can reuse scripts to deploy similar architectures across different projects or environments. This not only saves time but also ensures consistency and reduces the chances of human error during setup.
How does Terraform fit in?
Terraform acts as the glue that binds this architecture together on Azure ADLS. With Terraform, you can automate the creation of your Azure storage accounts, resource groups, and even the hierarchical structures needed to support the Medallion layers. It provides a declarative approach to infrastructure management, allowing you to define your desired state and let Terraform handle the rest.
By leveraging Terraform’s capabilities, you can:
- Automate: Automate the provisioning of the Bronze, Silver, and Gold layers in Azure ADLS, ensuring a consistent and repeatable setup.
- Version: Keep track of changes to your infrastructure with version-controlled Terraform scripts, making it easier to manage updates and rollbacks.
- Scale: Quickly adapt to new requirements by modifying your Terraform scripts to scale your data architecture as needed.
Implementing the Medallion Architecture
For this, we’re going to be creating the “main.tf,” “variables.tf,” “terraform.tf,” and “outputs.
In this blog, we’ll be creating a storage account on Azure with three containers corresponding to these layers, using dynamic and reusable Terraform code. Here’s what I’ll create:
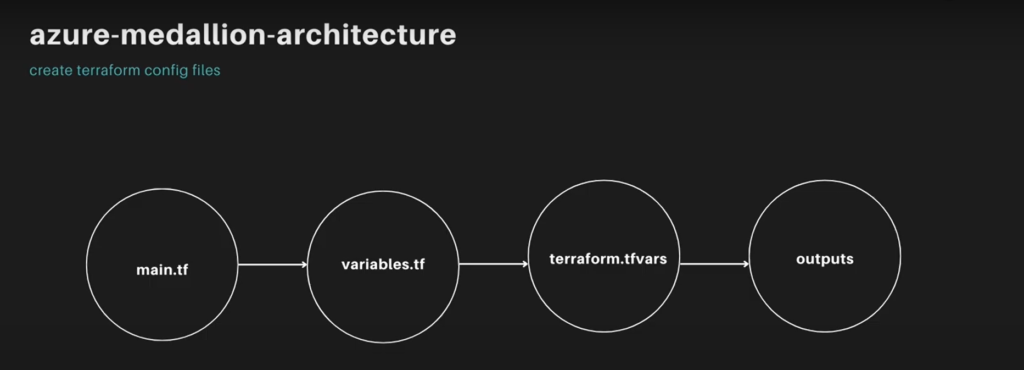
- main. tf: This file serves as the core of the Terraform configuration, defining the infrastructure resources. For instance, it will create an Azure storage account. In other projects or organizations, this file may need to define many more resources, sometimes tens or hundreds, depending on the use case. Terraform ensures this process remains reusable.
- variables. tf: This file defines input variables, allowing for the parameterization of the Terraform configuration, enhancing flexibility and reusability. For example, variables for the resource group name, location, and storage account name will be defined here.
- terraform. tfvars: This file specifies concrete values for the variables, such as the data lake resource group and location.
- output. tf: This file defines the outputs that Terraform should produce after applying the configuration, such as the details of the created resources.
Walking Through Each File
- main.tf: This file defines the infrastructure. For example, it will create an Azure Resource Group, specify the provider (
azurerm), and use values from the variables file. The configuration is declarative, meaning it specifies the desired state, and Terraform manages the provisioning accordingly.
# main.tf

provider "azurerm" {
  features {}
}

resource "azurerm_resource_group" "rg" {
  name     = var.resource_group_name
  location = var.location
}

resource "azurerm_storage_account" "adls" {
  name                     = var.storage_account_name
  resource_group_name      = azurerm_resource_group.rg.name
  location                 = azurerm_resource_group.rg.location
  account_tier             = "Standard"
  account_replication_type = "LRS"
  enable_https_traffic_only = true
  is_hns_enabled           = true  # Enable hierarchical namespace for ADLS Gen2

  blob_properties {
    delete_retention_policy {
      days = 7
    }
  }
}

resource "azurerm_storage_container" "bronze" {
  name                  = "bronze"
  storage_account_name  = azurerm_storage_account.adls.name
  container_access_type = "private"
}

resource "azurerm_storage_container" "silver" {
  name                  = "silver"
  storage_account_name  = azurerm_storage_account.adls.name
  container_access_type = "private"
}

resource "azurerm_storage_container" "gold" {
  name                  = "gold"
  storage_account_name  = azurerm_storage_account.adls.name
  container_access_type = "private"
}- variables.tf: This file enables the reuse of configurations by eliminating the need to repeatedly enter the same information, enhancing dynamism. For example, it defines variables such as “resource group name”, along with their data types and descriptions.
# variables.tf

variable "resource_group_name" {
  description = "The name of the resource group"
  type        = string
}

variable "location" {
  description = "The location of the resource group"
  type        = string
  default     = "West Europe"
}

variable "storage_account_name" {
  description = "The name of the storage account"
  type        = string
}- terraform.tfvars: This file contains specific values, such as the resource group name and location, which can be adjusted at any time to make modifications.
- output.tf: This file defines outputs to display messages and details once resources are created, providing information on what has been set up.
# outputs.tf

output "resource_group_name" {
  description = "The name of the resource group"
  value       = azurerm_resource_group.rg.name
}

output "storage_account_name" {
  description = "The name of the storage account"
  value       = azurerm_storage_account.adls.name
}

output "bronze_container_name" {
  description = "The name of the bronze container"
  value       = azurerm_storage_container.bronze.name
}

output "silver_container_name" {
  description = "The name of the silver container"
  value       = azurerm_storage_container.silver.name
}

output "gold_container_name" {
  description = "The name of the gold container"
  value       = azurerm_storage_container.gold.name
}
To follow along with what we have done so far, you can check the git repository {https://github.com/david-ikenna-ezekiel/terraform} to better understand the configurations we have implemented. I’ve hidden sensitive files with `.gitignore` for security. In my README file, I list steps to replicate what I’ve done so you can deploy your Azure storage.
Prerequisites
This guide outlines the installation process for the necessary tools to manage Azure infrastructure using Terraform.
- Terraform: Download and install Terraform from the official HashiCorp website: https://developer.hashicorp.com/terraform/tutorials/aws-get-started/install-cli. The website provides installation instructions for macOS, Windows, and Linux.
- Azure CLI: The Azure CLI enables communication between your machine and Azure by verifying your credentials. An active Azure account and subscription are required. Learn more and install the Azure CLI following the official Microsoft documentation: https://learn.microsoft.com/en-us/cli/azure/install-azure-cli
Cloning the Terraform Configuration
To clone the repository, we are going to obtain the repository link by locating the repository and copying its link. Next you’re going to open your terminal application; this depends on the terminal you’re running with (e.g., Terminal on macOS/Linux or Git Bash on Windows). If you want to clone the repository into a specific directory, navigate to that directory using the “cd” command; for example, to create a folder named “terraform” and enter it, type cd terraform. Then, clone the repository by executing the command git clone [repo-link], replacing [repo-link] with the actual link you copied. Press Enter, and the terminal will display messages indicating the cloning process. To verify the clone, you should see an output like “Cloning into ‘terraform’…,” which confirms a successful clone.
Navigating and Exploring the Cloned Repository
Finding Your Current Directory (Optional):
If you’re unsure about your current directory path in the terminal, simply type “pwd”. This command will print the working directory (present directory) path.
Opening the Folder in VS Code
To begin, launch Visual Studio Code. Once the application is open, navigate to the “File” menu located at the top of the interface and select the “Open Folder” option. A dialog box will appear, allowing you to browse through your files. Locate and select the directory containing the cloned repository; you can use the path displayed by the pwd command in your terminal if you’re unsure of the location. After selecting the appropriate folder, click the “Open” button to load the project into Visual Studio Code.
Exploring Configuration Files
Once your repository is open in VS Code, explore the key Terraform configuration files:
main.tf: This file typically defines the infrastructure resources you’ll provision in Azure, such as resource groups and storage accounts.variables.tf: This file stores the variable definitions used throughout your Terraform configuration. Variables allow for flexible configurations by separating values from the code.output.tf(Optional): This file defines outputs that display information about the created resources after applying the configuration.
Understanding the Workflow
Terraform follows a well-defined workflow to manage your infrastructure:
- Initialize: Run the
terraform initcommand in the terminal within your project directory. This initializes Terraform and downloads any necessary provider plugins. - Plan: Execute
terraform planto generate a detailed plan outlining the resources that will be created or modified based on your configuration. This is a dry run and doesn’t make any actual changes. - Apply: After reviewing the plan and ensuring it’s as expected, run
terraform applyto create the resources in Azure. You’ll be prompted to confirm the execution; type “yes” to proceed. - Destroy: If you need to tear down the provisioned resources, use the
terraform destroy. This initiates the deletion process. Confirm the destruction by typing “yes” at the prompt.
Example Commands
Here are some examples of the Terraform commands in action:
- Initialize: Bash
terraform init - Plan: Bash
terraform plan - Apply (confirm with “yes”): Bash
terraform apply - Destroy (confirm with “yes”): Bash
terraform destroy
Conclusion
This guide has equipped you with the knowledge to provision a Medallion Architecture on Azure ADLS using Terraform. By leveraging infrastructure as code, you’ve gained the ability to manage your data lake infrastructure efficiently and repeatably.
Remember, Terraform offers a powerful toolset for managing complex infrastructure deployments. As you explore further, consider integrating additional Azure services and customizing the provided Terraform configuration to suit your specific needs.
For further exploration, consider diving deeper into advanced Terraform features like modules, remote state management, and version control integration. With these techniques, you can build robust and scalable infrastructure pipelines for your data lake on Azure.



An outstanding share! I’ve just forwarded this onto
a coworker who has been doing a little homework on this. And he in fact ordered me
dinneer simply because I discovered it for
him… lol. So let me rword this…. Thanks for the
meal!! But yeah, thanks for spending some time
to talk about this topic here on your blog. https://Evolution.org.ua/
Great, happy you found this helpful and it got you a great dinner. Lol