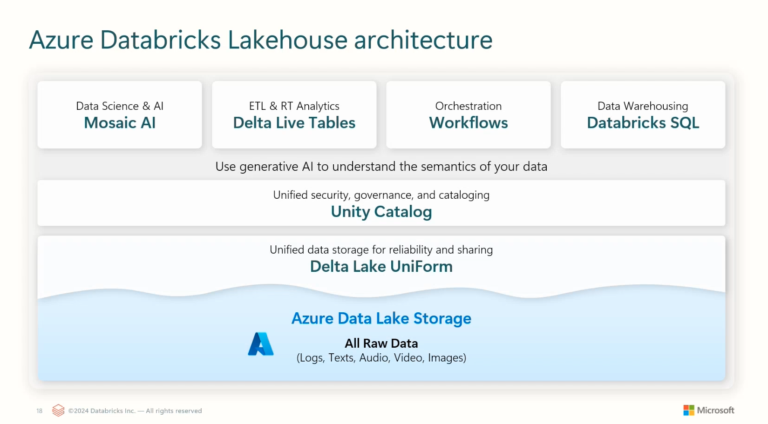
Have you ever wondered how to set up a scalable storage solution for big data analytics? Or perhaps you’re curious about the best way to organize and manage vast data. Maybe you’ve attempted setting up a data lake storage system before—how did that go for you? What challenges did you encounter, and what worked out well? Today we will explore the process of creating a data lake together. Whether you’re a seasoned data professional or just beginning your journey, setting up Azure Data Lake Gen-2 can open up new data management and analytics possibilities. You can read up here to learn about Azure.
In this article, I’ll walk you through creating and configuring your Azure Data Lake Gen-2 storage. By the end of this post, you’ll be able to store and manage your data efficiently. If you’d like a more detailed explanation, you can also watch the video embedded in the article for a step-by-step guide.
I have provided an accompanying video to help you follow the process step-by-step. You can check it out here –
Prerequisite
We are going to need to set some things in place before we can begin to work on this task. These things:
- An active Azure subscription
- Appropriate permissions within your Azure account (typically Owner, Contributor, or Storage Account Contributor role)
- A resource group in Azure (you can create a new one or use an existing one)
- Basic knowledge of Azure portal navigation
Additionally, it’s helpful to have:
- Understanding of data lake concepts and use cases
- Familiarity with Azure storage services
If this is set up, let’s use this step-by-step process to create our storage.
Step-by-Step Process
1. Creating and Configuring a New Storage Account
To begin with, first, open the home page of your Azure portal. If this is your first time using Azure, you’ll need to set up an Azure account using this link.
If this is your first time using Azure, you’ll need to set up an Azure account using this link. Once that’s done, click the Create a Resource button on your home screen. This will bring up a new page with a search bar.
On the Create a resource tab, look for the search bar, search storage account, and click on the correct option that pops out.
Next, you’re going to see the storage account page. Click on Create to create a new storage account.
The new page that appears should be Basics. This is where you fill in the project and instance details in the provided fields.
In the Subscription field, select the subscription where you want to create the storage account. In the Resource group field, choose the resource group where your Azure resources will be deployed and managed.
Once you’ve done this, you’ll need to configure the new storage account. Start by choosing a unique name to distinguish it from others. If you already have a resource group, select it to keep your resources organized.
2. Set Performance and Redundancy
For performance, the default Standard setting works for most needs, but you can opt for Premium if your business requires it. Stick with Geo-Redundant Storage (GRS) for redundancy.
3. Enable the Hierarchical Namespace
Next, navigate to the Advanced tab and enable the Hierarchical Namespace option.
This step is essential because it leverages the capabilities of Data Lake Storage, which provides robust file and directory semantics, enhances the performance of big data analytics, and supports Access Control Lists (ACLs) for fine-grained security.
Enabling this feature transforms your storage account into a Data Lake Storage Gen2, optimizing it for large-scale data management.
After enabling this option, leave the other advanced settings unchanged. Then, move on to the Networking tab, where the default settings are fine for your requirements.
4. Configure Data Protection
On the Data Protection tab, set the Days to retain deleted containers to 7 days.
When setting this up for your organization, you might need to adjust it based on your policy.
5. Review and Create
You will need to review what you’ve done and make sure it’s what you want for your storage account.
After reviewing the settings and making sure it’s what you want, hit Create.
The deployment might take a few minutes. Once it’s done, navigate to the new Data Lake Storage resource.
6. Manage Containers
Inside the Data Lake Storage, you can create and see created containers. Any necessary setting changes can be made here.
Create a container called Demo.
Within this container, you can manage ACLs, create Shared Access Signatures (SAS), set access policies, check properties, and view the metadata of your stored data.
You can upload data to your container. If you don’t have any dummy data, you can connect the metadata to Databricks, a data warehouse, or any data source. A standout feature of Data Lake Storage is its ability to organize data hierarchically and offer data cataloging.
You can also connect your data lake to Azure Purview. This will let you scan and get a clear view of all the data stored in your data lake.
Conclusion
Creating and configuring Azure Data Lake Gen-2 Storage is a pivotal step toward optimizing your data management and analytics capabilities. By following these straightforward steps, you can harness the full potential of Azure’s powerful data storage solutions. Whether managing vast datasets or streamlining your data processes, Azure Data Lake Gen-2 provides the scalability and efficiency you need to stay ahead. Start building your data lake today and unlock new possibilities for your business.
Feel free to reach out if you have a question or need further assistance.

